Friday, September 30, 2011

Freaky about fennel

Do you ever have one of those “Aha!” moments when it comes to herbs and spices? A few years ago, it was Chinese Five Spice. I was flabbergasted that I had never discovered this amazing combination of star anise, cloves, Sichuan pepper, cinnamon and, fennel seeds. And that segways nicely into this blog about fennel seed. I became familiar with this spice when a co-worker suggested I add it to my potato salad or coleslaw recipe.

On a recent Sunday, I discovered a new use for fennel seed....this delicious Italian-style Slow-Roasted Pork Roast. I got this recipe out of the Wegman’s Menu magazine. This is not a weeknight kind of a meal as it takes eight to ten hours to roast. With fall right around the corner, I recommend you prep this roast the night before, let it sit in the fridge and soak up some of the flavors overnight and pop it in the oven in the morning on a Saturday or Sunday when you plan to be around the house for a while.

You’ll need:

3 small onions, peeled, halved and sliced

2 navel oranges, unpeeled, sliced (I used blood oranges)

A seven to 10 pound pork shoulder

6 cloves of garlic, minced

1 tbsp of fennel (I used more because I’m a freak about fennel)

Salt and pepper

The day before, combine the onions and orange slices in the roasting pan. Diaganolly score the fat-side of the pork about ¾ of an inch in a diamond pattern. Rub the garlic and fennel seeds on top of the pork and season well with salt and pepper. Place the pork on top, cover with plastic wrap and refrigerate overnight.

On the day of the meal, preheat the oven to 275 degrees. Remove plastic wrap and bake uncovered for seven to eight hours.

Remove from the oven and place the roast on a clean platter to rest. You can use the juices to make gravy or use as au jus. It is delicious, aromatic, and actually pretty easy. It goes well with mashed potatoes.

Wednesday, September 28, 2011

Your pantry's worst enemy


Please forgive me if this topic turns your appetite. I haven’t been cooking much this week so I figured I’d write about something that’s been plaguing my food supply for over a year now. The little brown pantry moths, also known as Indian Meal Moths, have become the bane of my kitchen. It seems every time I use pasta or rice, I am confronted with them. These invasive pests are more active in the summer. They will eat anything from dried fruit to nuts, grains, rice, cereal, oats, powdered milk, chocolate, candy, seeds, pet food, crackers, pasta, and leave behind their silky webs in the process. In addition to the webs, the larvae will burrow tiny holes in packaging.

In my research, I came across Tiffany Muehlbauer’s blog No Ordinary Homestead. According to Muehlbauer, the brownish moths will lay somewhere between 60 and 300 eggs which will hatch two to 14 days later. The mommy moth will usually lay these close to a food source so that once they hatch they don’t have very far to travel before they start to feast. The larvae/worms look a bit like small caterpillars are a whitish-yellowish color with little black heads and about 2/3-inch long. They will burrow into anything and everything they can find, continuing to eat for two to 41 weeks, depending on the temperatures. And once they are full, they will find crawl off somewhere looking for a cozy place to nest and spin a cocoon, which they will emerge from as a moth, starting the process all over again. This process is why it is so hard to get rid of the pests…while you think you’ve won the war, the moths are resting up waiting for their next attack.

The larvae can come from foods you buy in the stores so it’s important that you inspect every package you buy for signs of tiny little holes. Natural food stores with large supplies of grains and rices might be hosts of the moths as well. Be extra vigilant of the tell-tale signs when purchasing grains, flour, seeds, pasta, spices, dry pet food and birdseed. If the food you’re purchasing comes in a package that has flaps or is a bag inside a box (like cereal), you likely won’t see any evidence of them until you get the box home, according to Muehlbauer.

I’ve been battling these things for an entire year now with mixed results. I’ve cleaned out and thrown out any food with signs of the larvae or webs in them twice now. I’ve purchased Pantry Moth traps about four times. According to Muehlbauer, if you’ve had an infestation, it’s important to take everything out of your cabinets and vacuum up every trace of food, and even pull out appliances from the wall and clean behind them with soap and water. If you find traces of cocoons or worms in your food, get them as far from your house as quickly as you can.

Other recommendations include purchasing smaller quantities of foods that are susceptible to pantry moths, or make sure the items are stored in the fridge, freezer or airtight containers (though even some of those don’t work). If you continue to find moths, according to Muehlbauer, you need to go through your food stores and clean everything again. There are likely some moths or larvae holed up in a collection of plastic bags, a box of brownie mix or an airtight container you think they’d never get into.

Each time I go to war with these pests, I think it’s my last. But apparently, these things tends to overwinter, so if you are hopeful that come spring you’ll be rid of these pests, think again. For more information on pantry moths and how to salvage food that you think has been invaded by pantry moths, visit Muehlbauer’s blog on the topic.

Tuesday, September 20, 2011

Atomic Eggplant cravings

Many vegetarians and foodies in Rochester will probably perk up at the mention of the former Atomic Eggplant, now the Owl House, on Marshall Street. Recently I attempted to recreate one of my favorite dishes from the old Eggplant. I can’t remember if it was an appetizer or main course on the menu, or even just an occasional special, but the sweet potato and black bean quesadillas were delectable. I wish I could remember the exact combination of ingredients. Perhaps next time I will add some seasoning to the sweet potatoes. As I write, I’m realizing the Eggplant may have put curry powder in their version of these quesadillas. I welcome suggestions on how to tweak this recipe from anyone who recalls this mouth-watering combination, or anyone who’s tried something similar.

The recipe is pretty basic, though the potatoes and onions take a little while to bake, so start this when you are going to be around the house for a little while. You can also caramelize onions on the stove, but using the oven is less work in my opinion. This version of the recipe will make about eight quesadillas so cut it in half if you are cooking for just a few people.

You’ll need two onions, a few tablespoons of butter, three sweet potatoes, canned black beans, multi-grain quesadilla shells, and a crumbly Mexican cheese such as Queso Fresco (ask the people in the cheese section for help finding it.) For the topping you can use cream cheese, cilantro and/or salsa.

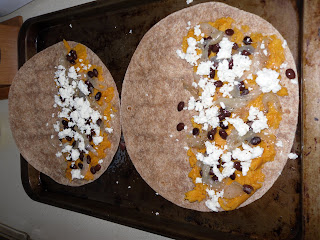
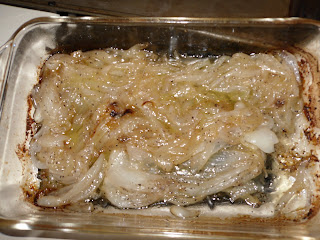
Clean about three large sweet potatoes. Pierce the potatoes with a knife and wrap them in tin foil. Be sure to put a baking sheet underneath the potatoes so they don’t leak sugar all over our oven. Trust me. I know from experience, and it creates a big mess and a lot of smoke. Next, caramelize the onions. This is done by slicing a few onions thinly lengthwise, placing them in a baking dish with a few squares of butter and some salt and pepper, covering them with aluminum foil and baking them at about 400 degrees.

The onions will be done after about 40 minutes…stir them halfway through and take them out when they start to look the color of caramel. The potatoes could take about an hour depending on the size. You want them mashable, but not over-baked…remember you’ll be baking the potatoes again inside the quesadilla shell.

Drain and rinse the black beans. Once the potatoes and onions cool, you can begin assembling your quesadilla. Preheat your oven again to 350 degrees.

Spray one side of the shell with some cooking spray and lay it down on a baking sheet. Mash sweet potato on half the shell. Then add some onions, black beans and cheese, and fold the top of the shell over to close the quesadilla. Continue until you run out of ingredients.

Bake the quesadillas for about 10 minutes, or until golden. Flip them and brown the other side. Once they’ve cooled and enjoy!

Monday, September 19, 2011

Scintillating salmon

If you like salmon, you’ll want to try this easy, melt-in-your-mouth recipe which I picked up working banquets at
Brio Mediterranean (now known as Pomodoro Grill and Wine Bar) in Pittsford. I always remember the way the staff would descend upon the leftovers after a banquet, like vultures on fresh road kill. One of the most popular was this salmon recipe which I’ll try to recreate for you. You could probably figure out some ways to make it lower in fat if you care to. I serve it over asparagus.

Rub four salmon filets with oil and salt and pepper them. Place them in a glass baking dish. Preheat your oven to 375 degrees and put the salmon in. Don’t worry about the oven being at temp when you do.

Create a cream sauce using two small shallots (the tiny onions that are located next to the garlic in Wegman’s), a pint of heavy cream, two to three tablespoons of capers (found with Goya products), and two to three tablespoons of Dijon mustard. Finely dice the shallots and heat them up in the pan before adding the cream, capers and Dijon, which goes in last. Taste the sauce as you mix the ingredients and vary up the amounts based on the flavor you prefer. Let that kind of simmer for five minutes, but keep an eye on it so it doesn’t burn or stick to the pot.

After the sauce is warmed up and thickening, pour it over the salmon while it cooks. Try to get some of the capers, shallot and mustard on top of the filets. And you can get fancy by putting a thin slice of lemon on top of each filet if you dare. Let the salmon cook until it flakes with a fork. With a finished dish as beautiful as it is delicious, your guests will be fighting like vultures over the pickings.

Wednesday, September 14, 2011

On a roll

In an effort to use some of the Thai basil that I grew this year and have not had a chance to use yet, I made fresh spring rolls a few weeks ago. It was one of the hardest recipes I’ve ever attempted. If you attempt this at home, you’ll want to get all your ingredients ready to go before you start rolling. Boil water in a soup pot on the stove while you get everything ready to go.

My spring rolls included medium shrimp (cooked and cut in halves down the center), avocado (thinly sliced), lettuce leaves (iceberg works best), Thai basil and mint leaves, Taiwan style Bean Thread (also known as cellophane noodles), and Spring Roll Skin (also found in Asian section).

Once you have staged all your ingredients, you can prepare your first Spring Roll Skin. They are round like a tortilla but stiff, translucent and very fragile. Handling these was the hardest part of the recipe. Submerge the skin in the boiling water for about 10-15 seconds. Remove it from the water using tongs or a spoon without letting it stick to itself if possible. The skin will be very hot and you will have to be gentle as you flatten it out on a clean surface and get it ready for the fillings. Try not to tear it.

Begin placing your ingredients on the skin about two-thirds of the way down. The easiest way to get all your ingredients to fit neatly in to the skin is to wrap it in a leaf of iceberg lettuce. So place maybe three or four shrimp halves, a few slices of avocado, a pinch of noodles and a few basil and mint leaves into a leaf of lettuce on the spring roll skin. Then roll it like a burrito.

I tried a different approach on my first time making these, using shredded romaine instead and rolling the ingredients in gradually, but the skin is very fragile and so too much tugging will tear the paper. Once you’ve successfully tucked all the ends, place the spring roll on a plate or something. Do not let the rolls touch one another until they’ve dried or they will stick to one another and tear when separated.

For my sauce, I mixed Hoisin sauce with some peanut butter, soy sauce, chicken broth and chili sauce (the kind that looks like pepper flake jelly…you’ll find it in the Asian section). This creation was almost as good as my favorite Thai restaurant, Flavors of Asia, but for the amount of work and the cost of the ingredients, I think next time I’ll probably consider paying the $4 for two spring rolls from Flavors rather than go through this painstaking process. Here's a video to help you along the way.